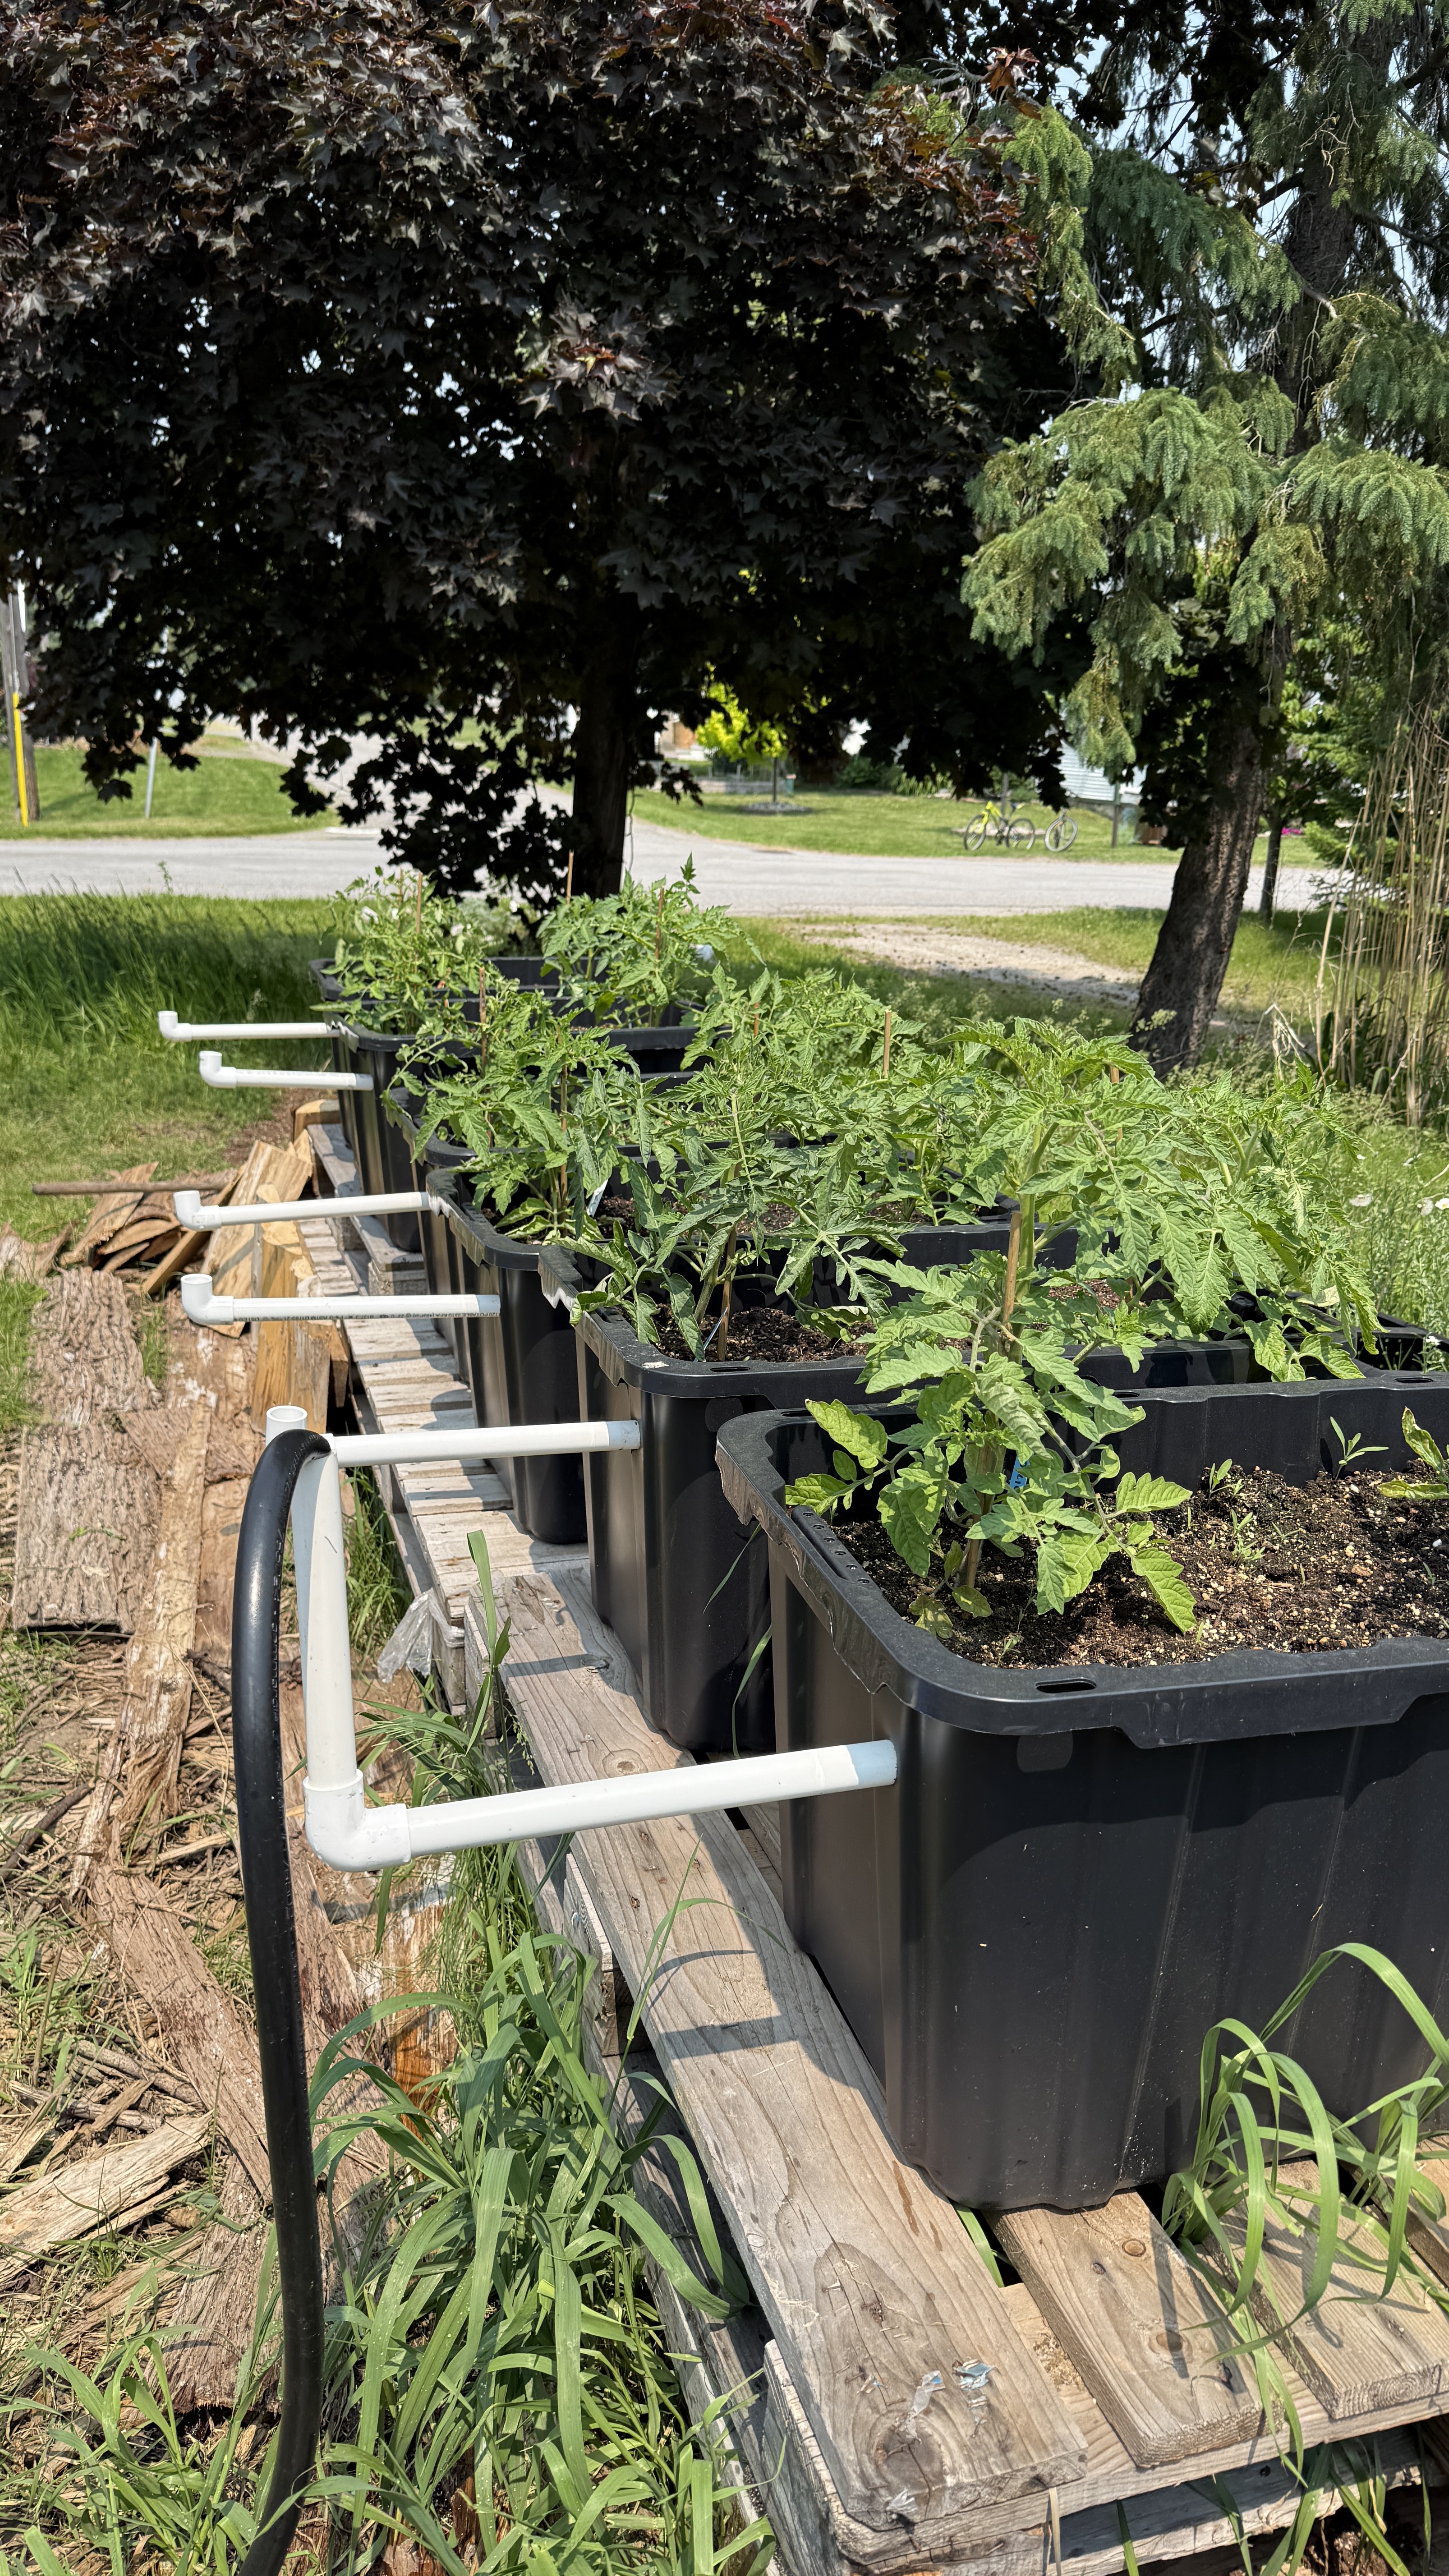
The best patch of sun I own sits on top of my septic bed 😅
When I bought my house in the village of Pakenham, the sunniest, most obviously-a-garden part of the yard turned out to be the one spot I'm not going to dig or grow vegetables in. That's where the septic system's holding tanks and weeping tiles run. You don't till that. You don't build heavy, permanent raised beds on it. You definitely don't put down anything with roots that go looking for water, as it’s asking for trouble with a much more vital function to my home.
So for the last four summers, every vegetable I've grown has come out of a plastic storage tote. I’m up to twenty totes now, each one holding two vegetable plants, filled with a modified potting mix, with a pipe sticking out of the top that I pour water down.
If you read 1,000 Pounds of Tomatoes, the "personal abundance" that kicked that whole thing off grew in these. I averaged 8lbs per tomato plant this summer, which is a worthy enough number to want to start sharing this method and have others become more food-sovereign next summer too.
This is part one: the why. If you're already sold and want to build some, part two is the how-to, with all of my real numbers.
Credit where it's due: AlboPepper
I didn't invent any of this, and I want that up front rather than tucked in a footnote.
For about seven years I've been watching Al Gracian, who runs the YouTube channel and website AlboPepper out of western Pennsylvania. He explains not just what to do but why it works: how water actually moves through soil, why one potting mix wicks and another doesn't, how much fertilizer a container can really hold, etc. He's spent well over a decade building, testing and refining sub-irrigated planters, and he publishes all of it for free. Huge respect for Al and his efforts, truly.
His videos are what convinced me these worked, long before I had anywhere to put one. And his 30-gallon tote tutorial is the design my bins are built on. Watching someone grow full-sized corn and watermelons in a storage tote, season after season, goes a long way toward overcoming the instinct that this is too simple to work.
So when I had a sunny yard I couldn't dig in, I already knew exactly what to build.
If this post gets you interested, you should also watch and read his stuff. He's the source. I'm just the four-year field test in the Ottawa Valley 🥸
What a sub-irrigated planter actually is
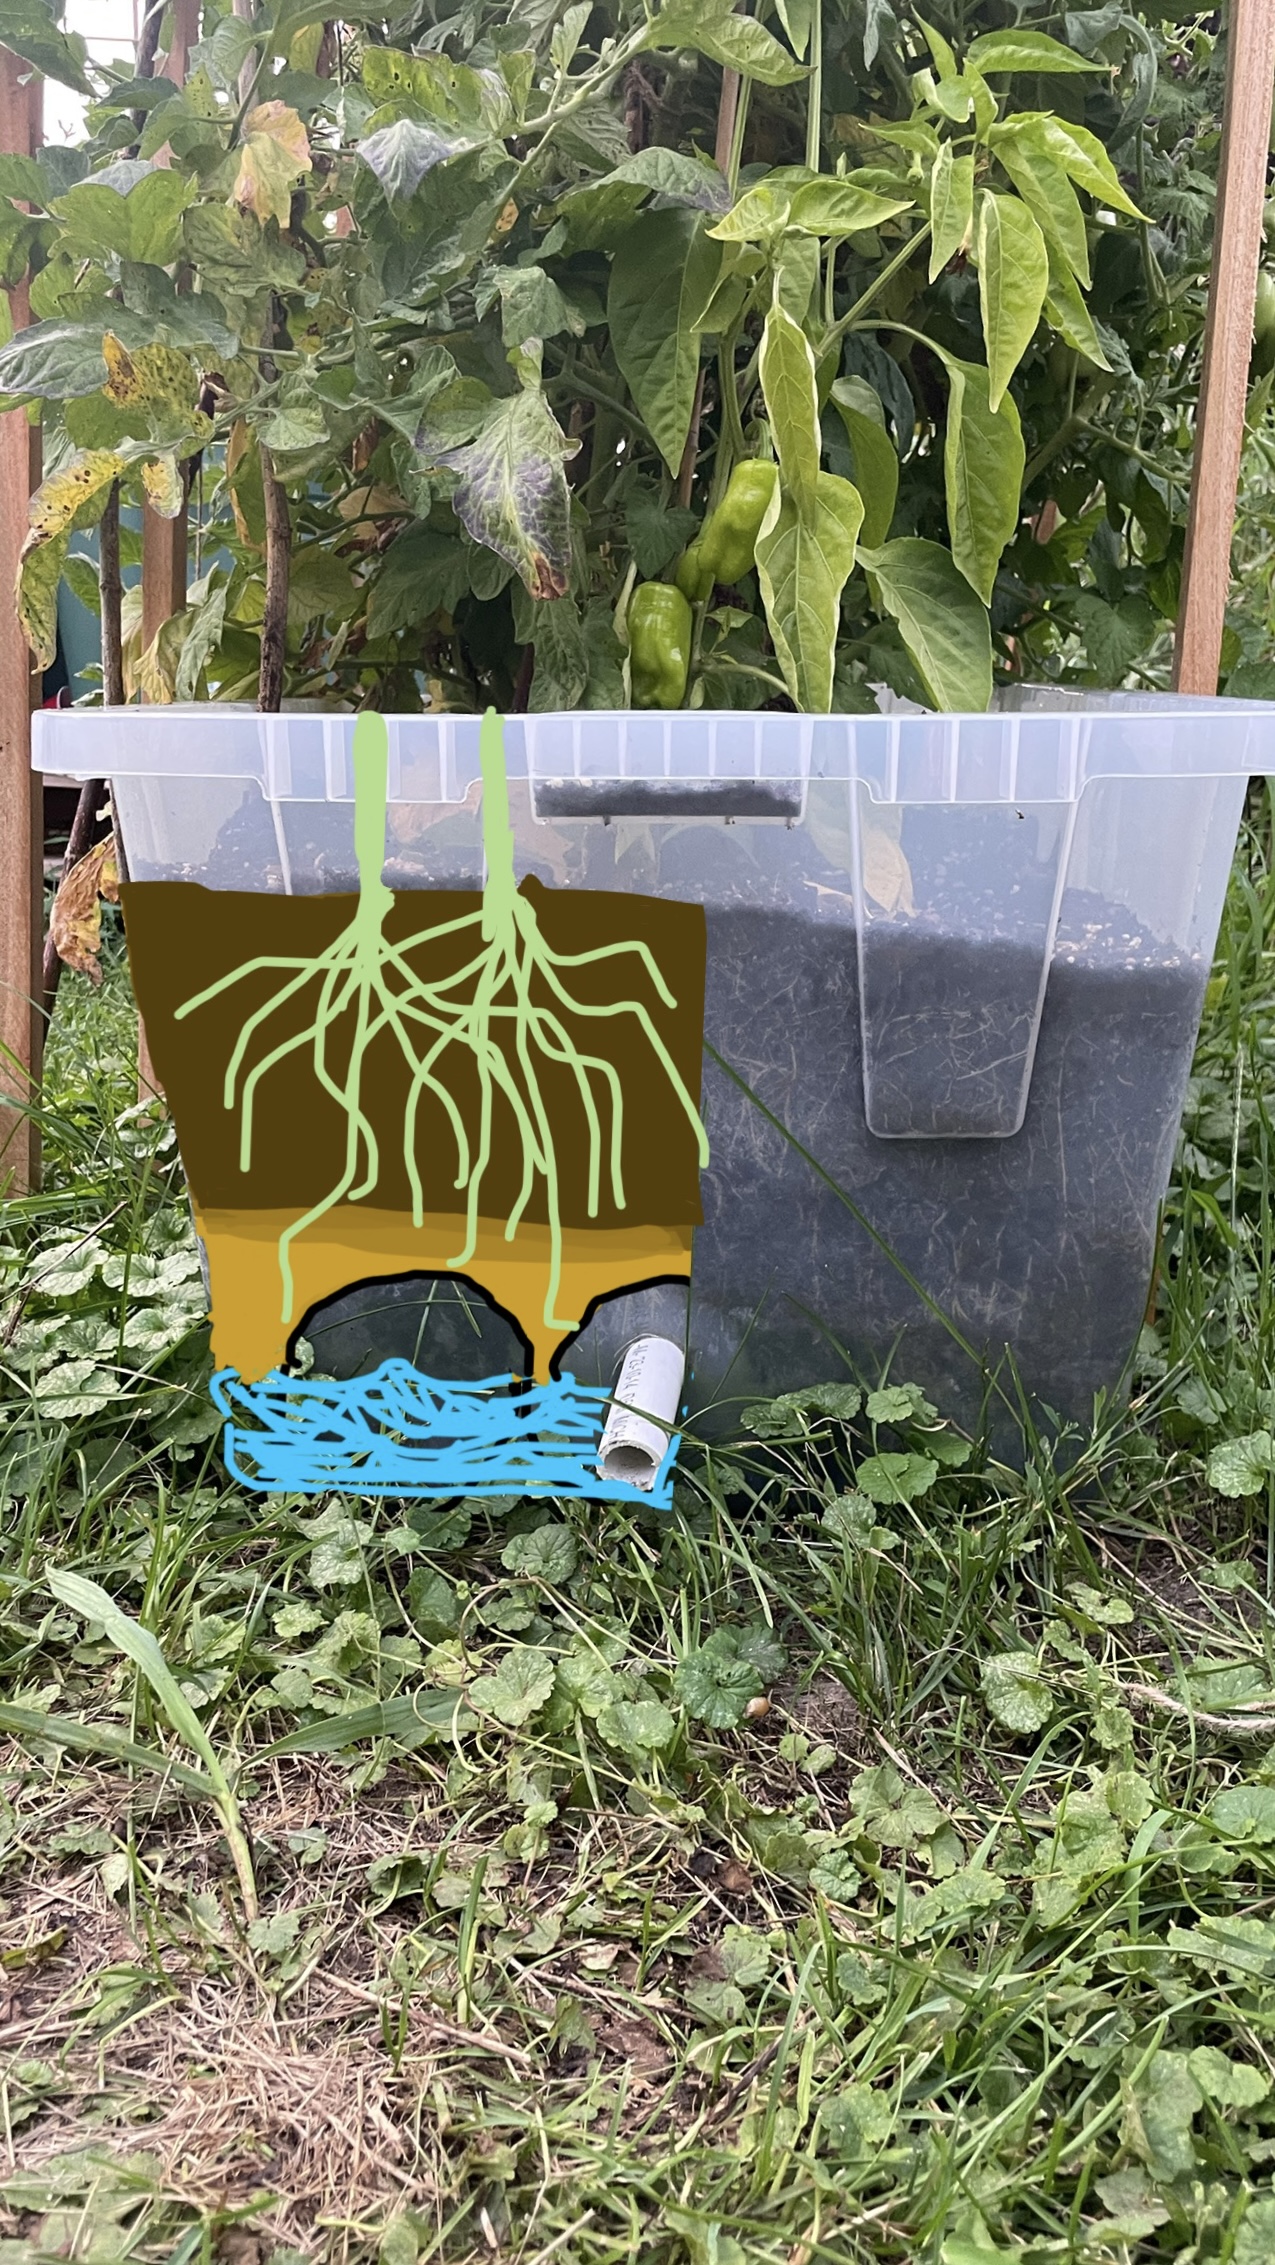
A sub-irrigated planter (SIP) waters plants from below instead of from above. That's the whole idea. We accomplish this through some basic plumbing.
AlboPepper explains it with a comparison I use all the time: this is just copying what the ground already does. Underground, water collects in saturated layers, and the soil just above them stays damp because water climbs up through it on its own, by capillary action — the same thing that pulls coffee up into a sugar cube ☕️ An SIP is a miniature version of that, built in a waterproof container.
Each bin has four working parts:
- A reservoir: where water sits, in the first few inches from the bottom. Mine is protected by 4” corrugated perforated drainage pipe laid along the floor of the tote, which hold water while also holding the soil up off it.
- A wicking layer: a potting mix packed around and between those pipes, almost touching the water. It pulls moisture up into the rest of the soil, steadily, as the plants use it.
- A fill tube: a pipe running from the surface straight down into the reservoir. You water the bin by pouring into the tube, not onto the soil.
- An overflow tube: a short pipe through the side of the bin at the top of the reservoir. When the reservoir is full, water comes out. That's how you know you're done, and it's what keeps a heavy rainstorm from drowning the roots. It’s also what allows extra oxygen into the bottom of the roots!
If you'd rather see it than read it, this is the video I'd start with: Self-watering Planter Basics (AlboPepper on YouTube)
The case for them
1. They use less water, and none of it is wasted
When you water a normal pot, a good chunk runs straight out the bottom, taking nutrients with it. Water an in-ground garden and much of it evaporates off the surface or soaks down past the roots.
With a bin, the water goes into a closed reservoir under the soil and stays there until a plant drinks it. You don't have to fill it to overflowing, so on a normal day nothing runs off. And when it rains, rain soaks down through the mix and tops up the reservoir before anything spills out the side.
Here's what that looks like in practice, with twenty bins in the Ottawa Valley:
- A cooler June: filling every three or four days
- A heatwave: every second day
- After a good rain: a day or two off
- This year: it was so wet that I effectively didn't water at all through June and July 😅
And watering takes less attention and time per bin. You're filling a tube until it overflows, not standing there with a hose trying to soak the soil. I often tend to the plants while they are getting watered.
2. Steady water means better plants
A lot of common vegetable problems are really watering problems. Blossom-end rot on tomatoes, splitting fruit, bitter lettuce, plants that bolt early, etc… much of it comes down to soil going bone dry and then suddenly soaked on repeat.
This bin wicks continuously. The roots sit in soil that's evenly damp below and drier on top, all season, whether or not you remembered to water on Tuesday. Plants that like steady moisture take off. Tomatoes are my favourite thing to grow in them, and the summer of 2025 gave me far more peppers than any one household needs 😅
3. You don't need good ground, or any ground at all
Bins don't care what's under them. Clay, gravel, a driveway, a deck, a rental with a landlord who'd rather you didn't dig up the lawn. Or, in my case, a septic bed. You're growing in a mix you control, so there's no soil testing, no amending, and no wondering what was sprayed there in decades past.
4. Your garden can move
This is one of my favourite things about them. A planter bin can be moved to a sunnier spot, to the other side of the yard, or to a new house entirely. Even mid-season. Between each of my seasons, I’ve moved mine around quite a bit, and only this past summer did I build a nice little frame around them in their “permanent” homes, which can still be moved in minutes anyways.
It's a two-person lift (a full bin is somewhere around 200 pounds), but compare that to relocating a raised bed that doesn’t have a bottom, and the logistics are way kinder. This also means I can gift bins and get them back, at any part of the growing stage too.
5. Weeds barely exist
You start with clean mix, and the soil surface sits well off the ground. Weeding becomes something you do while walking past with a coffee.
6. They last
My black totes are four seasons in and still solid. They sit outside all winter, untarped, through Ottawa Valley freezes, and they're fine. (One lesson on that in part two: don't use clear ones.) And if one ever does crack, it's an $11 swap, since you’re reusing the same soil and piping inside 🤷♂️
7. They're cheap
Store-bought self-watering planters exist, and they work, but they tend to be smaller and pricier than you'd expect. I’ve continued to shop around year after year, and these totes hold substantially more soil, and give roots more depth, than popular retail kits.
Here's what one of mine actually costs, after tax:
- 102L black tote: $10.99
- Corrugated drain pipe (3 lengths × 29"): $11.89
- PVC (18" fill spout + 4" overflow): $3.94
- Wicking layer mix (~1.5 cu ft): $16.63
- Main layer mix (~1.3 cu ft): $15.93
- Total: $59.38 per bin
About half of that is hardware and half is soil. Neither the bin nor the soil is a yearly cost, either: the mix holds its structure for years and just needs topping up and feeding (more on that in part two). Spread over the four seasons I've had them, that's about $15 per bin per year, before some later-life soil amendments.
8. Plus all the perks of any raised bed
Some of the benefits aren't about the reservoir at all. They come with gardening up off the ground, SIP or not:
- Easier on your body. The soil sits about 14" up, so there's far less bending and no kneeling in the dirt. Pull up a stool or sit on the edge of a frame. Set them up higher on something sturdy and they're workable from a chair, which opens gardening up to people with sore backs, bad knees, or mobility limits.
- Warmer soil sooner. Soil above ground warms up faster in spring than the ground does, which matters in the Ottawa Valley, where every extra week of season counts.
- Nobody walks on it. Paths stay paths, and the mix stays loose instead of getting packed down underfoot.
- Easy to cover. A bin-sized space is simple to drape with frost cloth on a cold May night, or to net against critters.
The honest downsides
It's plastic. I don't love that, and I won't pretend otherwise. What I'll say is that they are food-grade at least, and a good black tote is lasting me years outdoors. A garden that uses less water and grows a lot of food in a small footprint is a fair trade for a tub that would otherwise hold old sweaters.
They’re not very pretty. I personally don’t care because they’re growing me food in my own yard, but I have now gotten around to concealing the bins with a nice wood frame. Being plastic though, they could totally be dolled up with vinyl, stickers or spray paint in a pinch as well.
Full bins are heavy. "Movable" means with a friend, unless you drag them around.
Not every crop is a fit. I haven't tested everything. My rule of thumb: anything that likes steady moisture and warmth, the tomato pattern, will thrive. Anything that wants to dry out between waterings, or prefers dense, compact soil, probably won't love living on a wick. I’d love to experiment more and I do each year, but I also don’t want to grow less produce.
Bigger than my backyard
What gets me most excited now isn't my own twenty bins. It's what this could do for community food growing.
Think about why community gardens struggle. Someone has to water through every heatwave. Plots need good ground. Volunteers burn out. A bin garden needs far less labour, uses less water, and works on a church lawn without harming it, a schoolyard, or a strip of gravel behind a community hall. It's exactly the kind of thing that fits under food sovereignty: people growing food for themselves, close to home, without needing land.
But I want to be careful here, because it would be easy to oversell. The mechanism is well supported: steady water and less labour. Specific claims like "SIPs double your yield" mostly aren't backed by solid comparisons. So if a group ever wants to try this at scale, my suggestion is to run it as a side-by-side pilot: some bins, some conventional beds (which don’t have the reservoir bottoms), same crops, and actually measure water used, hours spent, and pounds harvested. Then you know. For me, I’m trusting the science and not bothering having some very wet roots in a bin where water can’t escape.
And if you want something to fill your bins with, the Pakenham Community Seedling Library I run gives seedlings away for free every spring, tomatoes and peppers included. A $60 bin and a free tomato seedling is a pretty low bar to clear 🤩
So, should you?
If you have a sunny patch of anything (a deck, a driveway, gravel, a lawn you'd rather not dig up, a septic bed) and you want food out of it without a summer of discouraging gardening, I think so. I’m happy to make the bins free of charge as they’re comfortable to do at scale. The soil could be too, if I had a way to mix it easier (like those concrete mixers at Home Depot I’m too frugal to rent or buy). Get one, plant a tomato and a pepper in it, and see what August looks like. Or have your church or community group buy a couple and tackle them as a team. They may be great use for grant funds, who knows!
Ready to build one? Part two walks through the whole build: materials, the layer stack, my mix, feeding, and four seasons of mistakes.
If this interests you and you want to make them happen, please reach out to me - tavis.pakenham@gmail.com.
Happy growing 💚
Tavis
Sources and further watching
All from AlboPepper (Al Gracian). If you watch nothing else, watch these:
- Self-watering Planter Basics: DIY Gardening with Sub-irrigated Wicking Beds — YouTube
- Self-watering SIP Sub-irrigated Raised Bed Construction (How to Build) — YouTube
- Improved: Self-watering SIP Raised Bed (Wicking Planter) Construction Tutorial & Tips — YouTube
- SIP Basics: How Self-Watering Sub-Irrigated Planters Work — albopepper.com/sips.php
- 30 Gallon Tote SIP Tutorial — albopepper.com/30-gallon-tote.php
The raised-bed videos use the same principles at a bigger scale. They're worth watching even if you're only building totes, because they explain the "why" behind every layer.