Part two: the how-to
This is the build guide for my sub-irrigated planter bins. If you're wondering why anyone would grow a garden in storage totes, start with part one: the case for them.
This is AlboPepper's tote design, adapted to the bins I could buy locally and my own mix. Read his full tutorial before you start. It has step-by-step photos and his reasoning behind every choice.
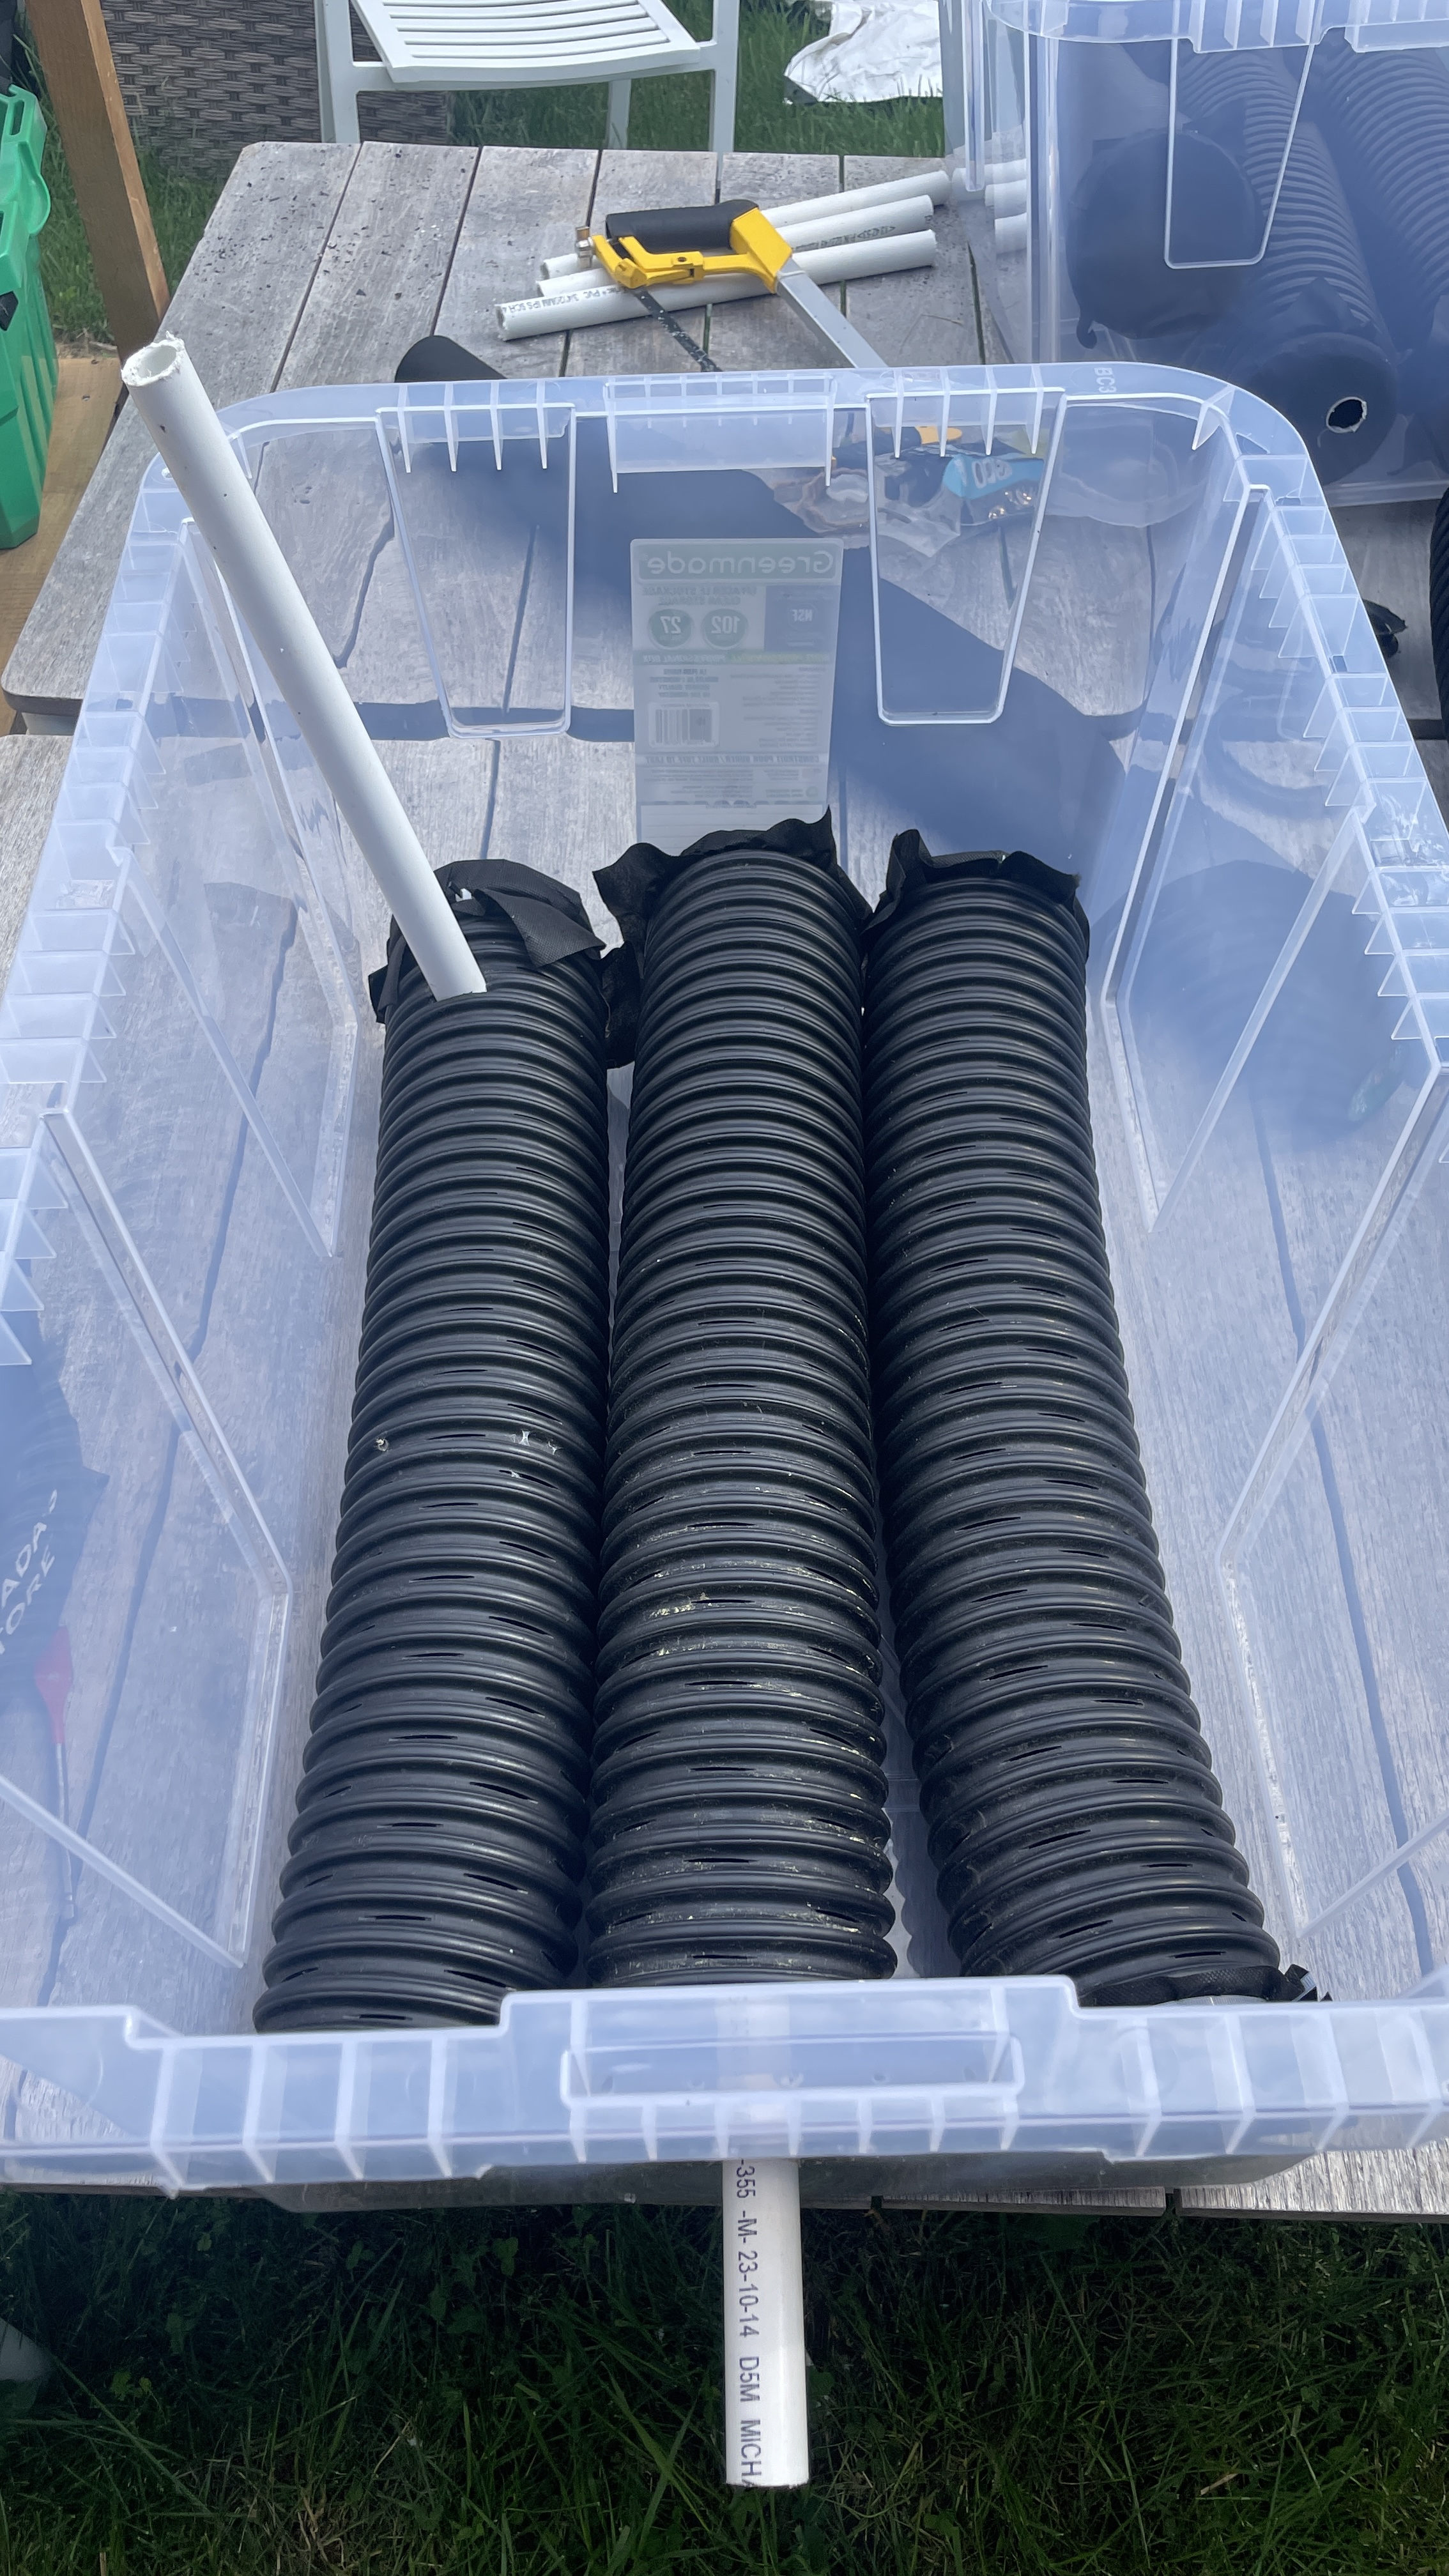
What you'll need, per bin
- A sturdy, black or opaque storage tote. Mine are 102L, from Costco, and are about 29 × 16 × 14" inside. I’ve never found them cheaper than Costco, and they’re always in stock there.
- About 7¼ feet of 4" perforated, corrugated drain pipe, cut into three lengths that run the length of the bin
- Landscape fabric to cap the pipe ends and keep soil out. I cut the fabric into squares, chain 2 long zip ties and secure the fabric with the ties around the pipe's grooves.
- 22" of 1” PVC pipe: 18" for the fill spout, 4" for the overflow
- A drill, and a dust mask or respirator for handling the mix
The layer stack
From the top down, in a ~14"-deep bin:
- 1" of headspace
- 5" of main mix
- 4" of wicking mix, packed around and over the pipes
- 4" of reservoir: the three pipes, with water filling to about 3"
Filled to the overflow, the pipes hold about 14 litres of water. I use 12L as my working number for planning water and feeding, since the reservoir is rarely bone dry when you top it up.
Building the reservoir
- Drill the overflow hole in one end of the tote, at the height you want the water to top out (about 3" up for my stack). Fit the 4" length of PVC through it, level.
- Cut the drain pipe into three lengths that run the length of the bin, and cap the ends. With the Costco bins, it fits 3-wide almost perfectly.
- Drill a hole for the fill spout in the top of one pipe, sized to fit your PVC.
- Protect the overflow. Line things up so the inner end of the overflow sits inside a pipe, meaning you’ll cut a slit in the fabric of one capped drain pipe end. A clogged overflow is the one failure that turns a self-watering bin into a swamp.
- Lay the pipes side by side along the floor, and stand the 18" fill spout in its hole.
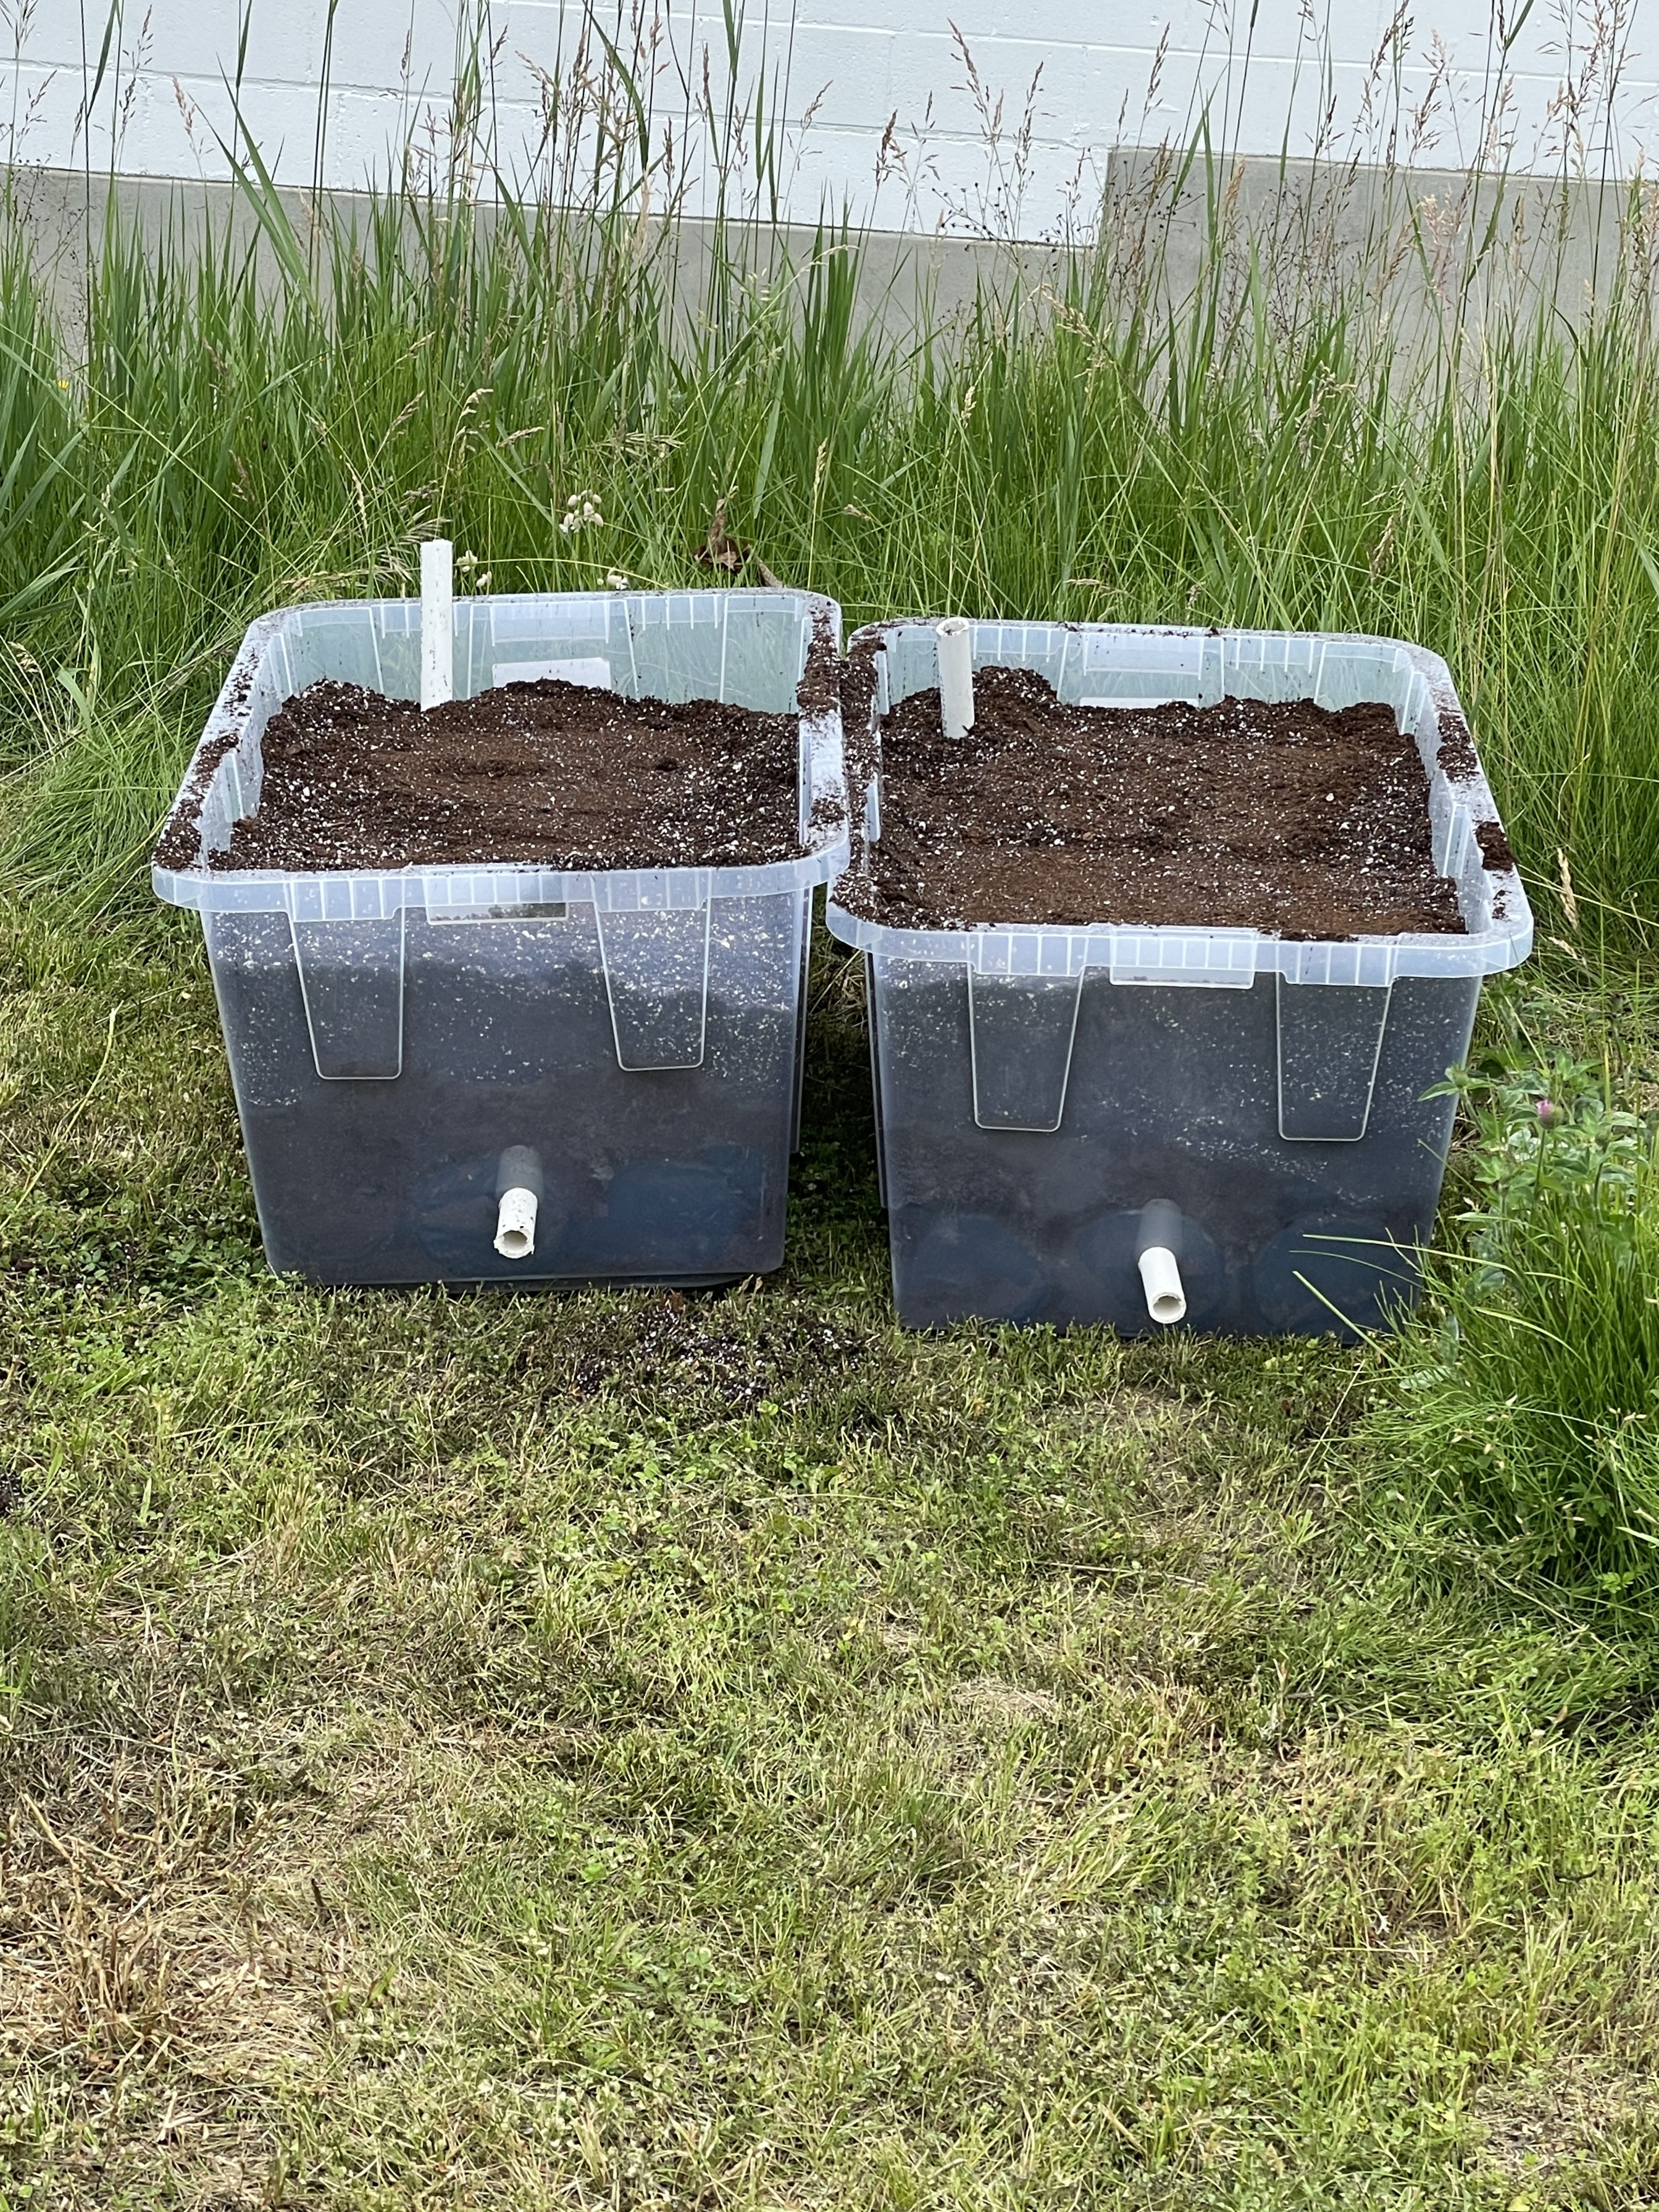
The mix
This is where I've departed most from AlboPepper's recipe, not because I’m better at it, but because I used what’s here and is simple. Mine, by volume:
- Wicking layer (1:1:3): perlite, coir, peat moss. About 0.3 cu ft each of perlite and coir and 0.9 cu ft of peat per bin.
- Main layer (1:1:1:2): Pro-Mix Herb & Veg (Costco again, lol), perlite, coir, peat moss. About 0.27 cu ft each of the first three and 0.54 cu ft of peat per bin.
The rule that matters more than any recipe: no garden soil, no topsoil, no straight compost. They're too dense and they compact, which kills the wicking and suffocates the roots. You want a mix with enough fine material to pull water up and enough air to let roots breathe.
Fill it
- Mask on. Perlite, coir and peat are dusty and you don't want them in your lungs.
- Lightly moisten the wicking mix and pack it gently around and between the pipes.
- Add the main mix on top, leaving an inch of headspace.
- Set the bin level, in full sun, and give it a good soaking. Sphagnum tends to be hydrophobic when really dry, so I want to make sure it’s wet.
What to plant, and how many
This year, every bin got one of these combinations:
- Tomato + tomato
- Tomato + pepper
- Herb + herb + herb
- Pepper + herb + herb
By square-foot-gardening standards, that's plenty of root room for each plant. The catch is above ground: two tomatoes in one bin will happily strangle each other if you let them, so they need regular pruning to stay apart. Not the worst problem to have, and I tend to let them spill out opposite sides.
Companions drink from the same reservoir. This is the thing people don't think about. Anything you tuck in beside your tomatoes is sharing their water. I stick to small, light drinkers: alyssum, nasturtium, calendula, or a single marigold. Thirsty or deep-rooted companions like borage, basil, or taprooted natives get their own space instead.
I also tried a few mini-SIPs this year in 5 gallon pails for things like mint. Same principle, smaller scale.
Year two and beyond: keep the soil alive
Two or three seasons in, I started wondering if my soil was worn out.
So, I went back to the source. AlboPepper's guidance was much more relaxed than my worrying: a good SIP mix holds its structure for years. Top it up with fresh potting mix rather than more peat, and flush the built-up salts out before the season starts. That's it.
What I've added since is mushroom compost, with a "feed the soil, not just the plant" approach:
- About 1.5 litres per bin, worked into the main layer only. Never the wicking layer, which needs to stay fine and consistent to do its job.
- A handful in each transplant hole, with some kelp liquid for the tomatoes.
Feeding by the reservoir
I started out with weekly Miracle-Gro and have been moving toward Canadian organic inputs. This season it was Acadian kelp through the reservoir, plus the mushroom compost.
The bit I'm happiest with is the schedule, because it's built around how the reservoir works:
- Feed at full rate every third fill. I mix one 1.89L jug at a time, which doses four reservoirs at about 470 mL each. Definitely not strict measurements, just eyeballing most of it. I’ll first fill with water, then go back and add this liquid mix.
- Plain water the rest of the time. The plain fills between feeds double as free salt flushes.
- A dedicated plain-water flush about every sixth fill, to be sure.
Honestly, feeding is the part I most want to tighten up and actually document next year. The different fertiliser numbers fascinate me, but also some plain ol' Miracle-Gro can do the trick too.
What went awry (four seasons of mistakes)
Same as always: I collect these mistakes, because they're the most useful part.
Linking the reservoirs
Twenty fill tubes is a lot of fill tubes, so I tried connecting the reservoirs together to water many bins from one point. It didn't work. Water only moves between bins if they sit at the same height, and in a real yard on uneven ground, they don't. Some bins flooded while others stayed dry. Individual fill tubes are simple, foolproof, and take seconds each. I've stopped trying to be clever 😅
Clear bins
Clear totes look great. You can watch the roots and see the water level. They also broke down in the sun within two years. The black ones are going strong at four. Function over fashion for these gardens.
Overthinking the soil
Not a disaster, but a pattern worth naming. When I got worried about my mix, my instinct was to start replacing things. The fix was cheaper and simpler: go back to the person who's actually tested this for a decade, and read what he says.
The numbers
- 4 growing seasons
- 20 bins
- $59.38 per bin, all in
- ~$15 per bin per season so far
- ~2.9 cu ft of mix per bin
- ~14 L reservoir, filled every 2–4 days in summer
- 0 times weeded on my knees
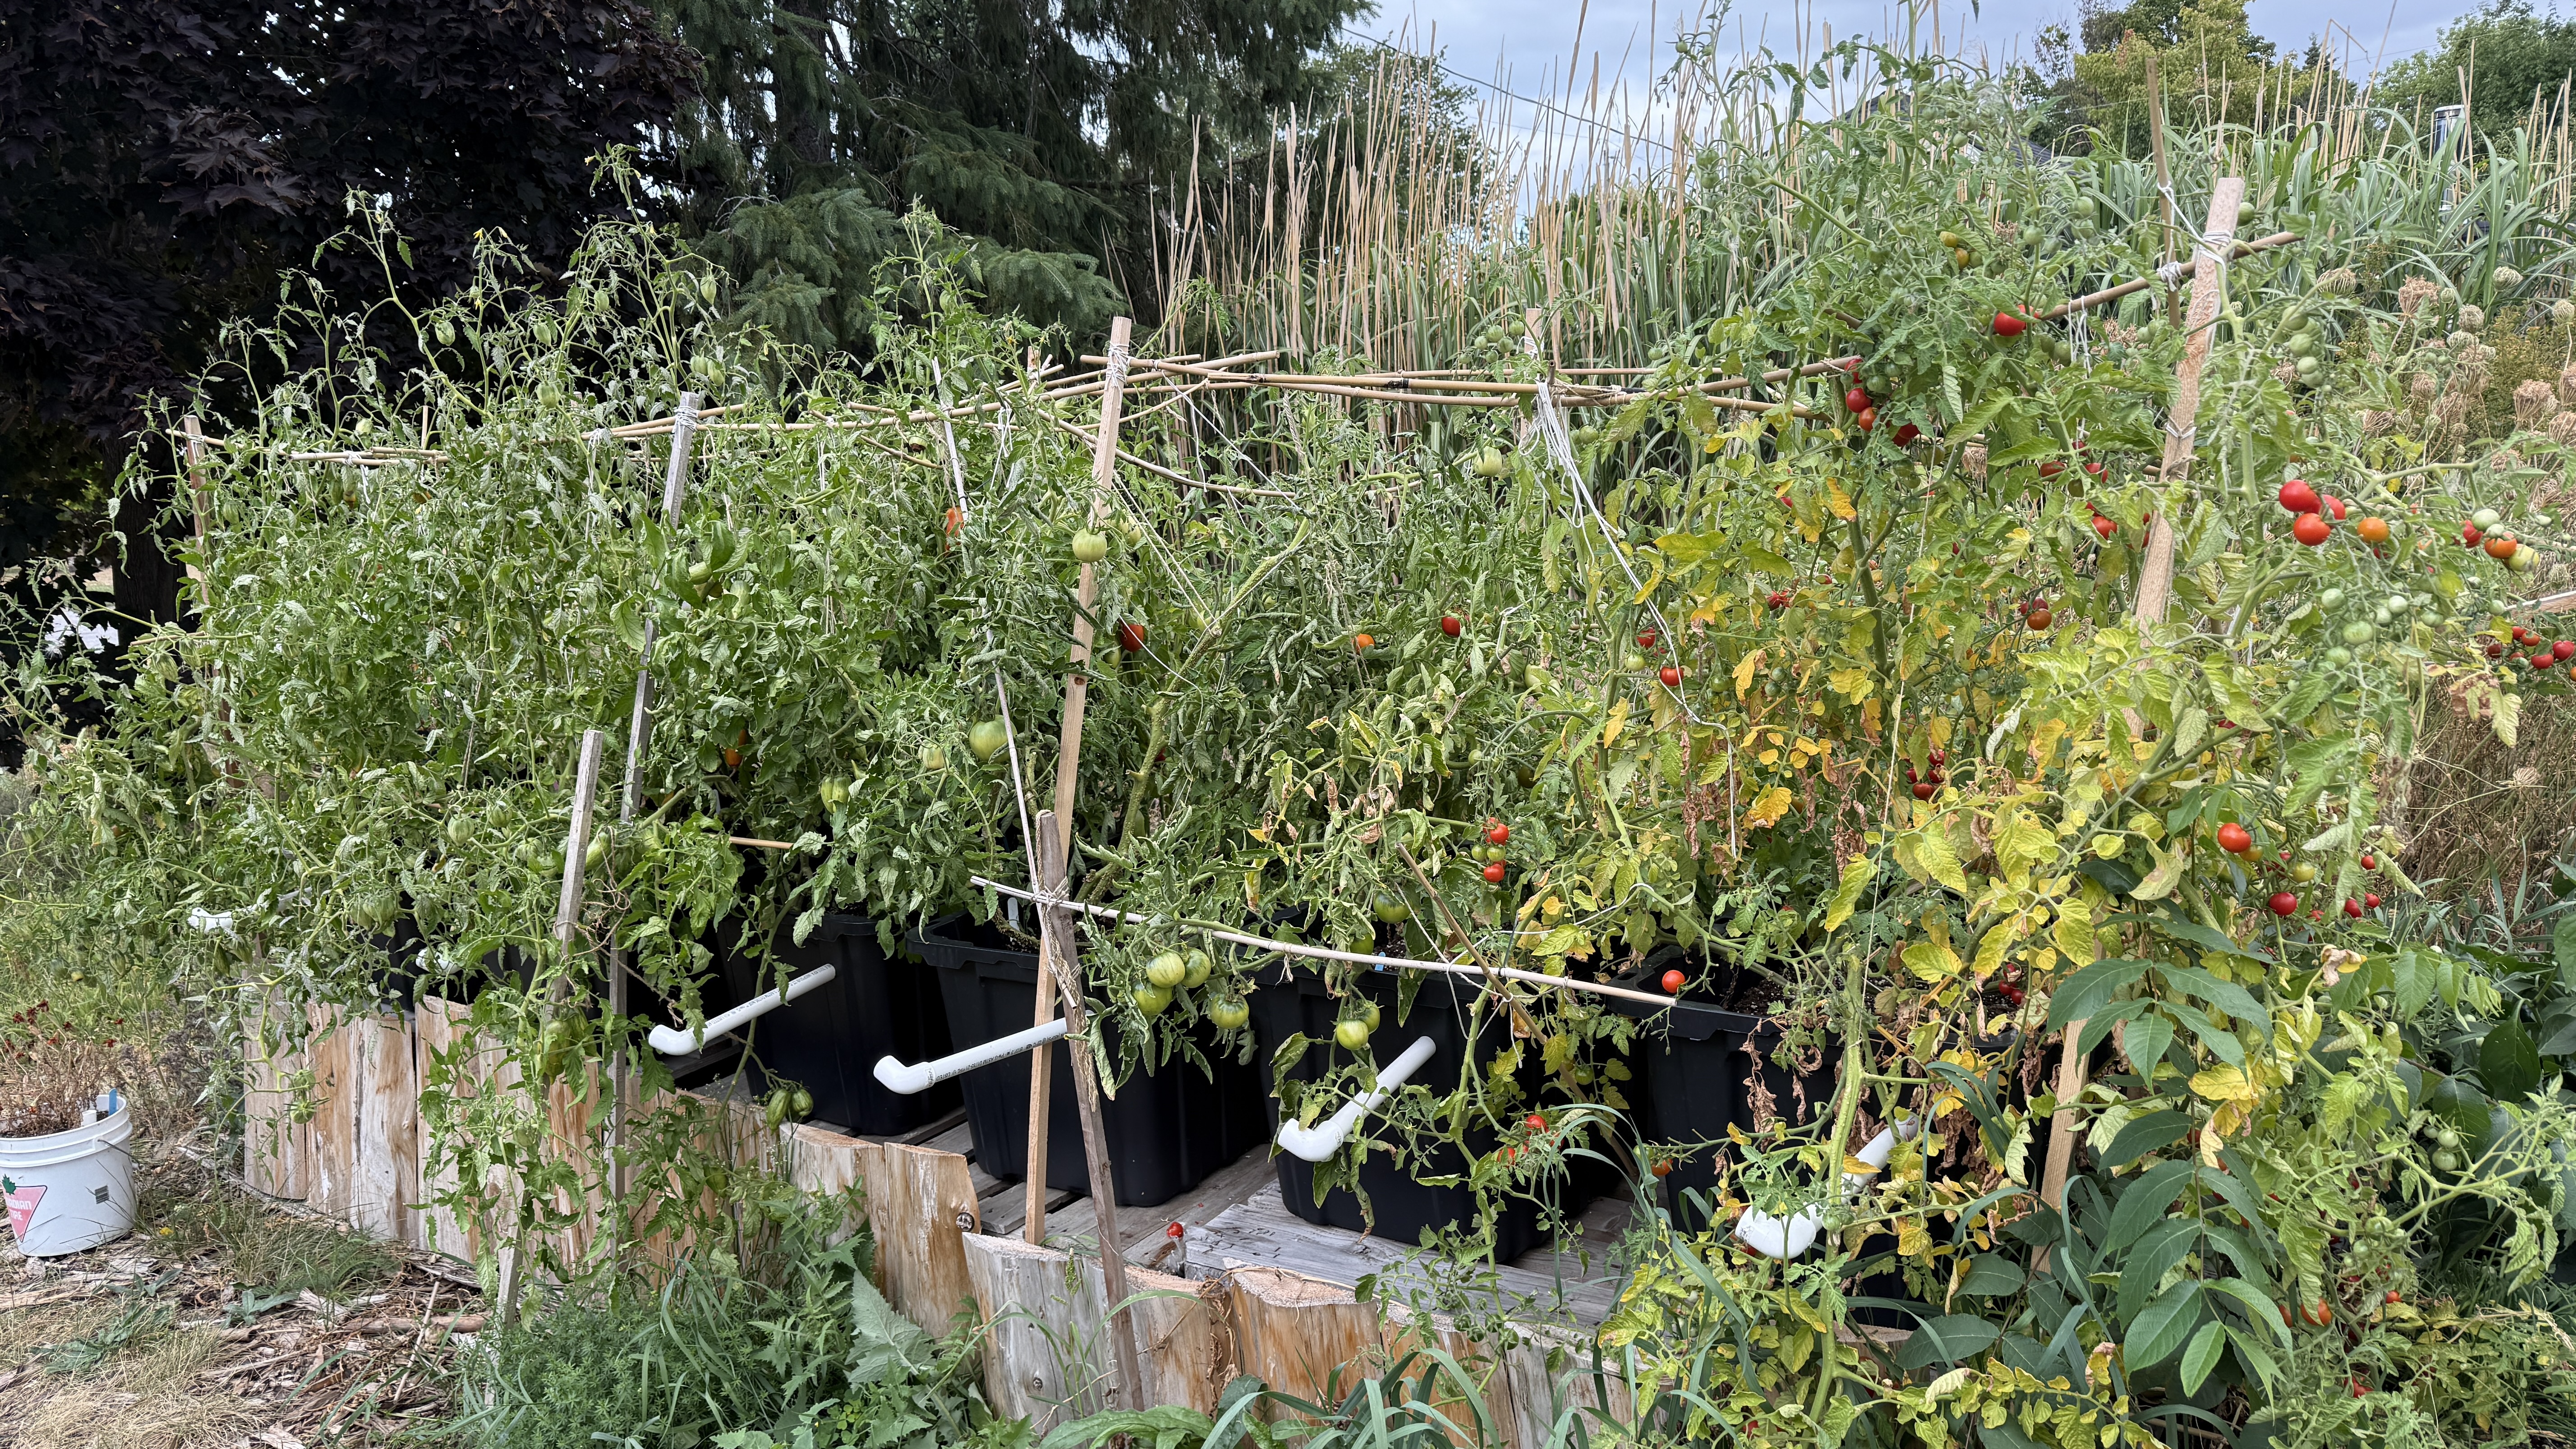
Go build one
One bin is an afternoon and about $60. Get one, plant a tomato and a pepper in it, and see what August looks like. If you build one, or want help making them happen for your church or community group, please reach out to me - tavis.pakenham@gmail.com.
And if you need something to fill it with, the Pakenham Community Seedling Library gives seedlings away for free every spring 🤩
Happy growing 💚
Tavis
Sources and further watching
All from AlboPepper (Al Gracian). If you watch nothing else, watch these:
- Self-watering Planter Basics: DIY Gardening with Sub-irrigated Wicking Beds — YouTube
- Self-watering SIP Sub-irrigated Raised Bed Construction (How to Build) — YouTube
- Improved: Self-watering SIP Raised Bed (Wicking Planter) Construction Tutorial & Tips — YouTube
- SIP Basics: How Self-Watering Sub-Irrigated Planters Work — albopepper.com/sips.php
- 30 Gallon Tote SIP Tutorial — albopepper.com/30-gallon-tote.php
The raised-bed videos use the same principles at a bigger scale. They're worth watching even if you're only building totes, because they explain the "why" behind every layer.